(n.) Cabindo: A condo on a lake, among tall old trees. Half cabin, half condo. My first home. This is a running journal of the renovations, projects, and general shoestring budget craziness.


- - - - - - - - - - - - - - - - - - - - - - - - - - - - - - - - - - - - - - - - -

Instagram

Showing posts with label bathroom. Show all posts

Wednesday, January 22, 2014

Updated 90's Medicine Cabinet

Another month passed??? Well $hit.
I've been doing little projects here and there when I have time, and helping my parents with an exciting undertaking; all the while neglecting The Cabindo. More to come on that undertaking soon, but in general: I'm back! And seeing as how I have little vengeance, I'll instead tell you about a recent project that will help me be ready for any potential incoming vengeance.

Enter: Lot of Misc. Construction Supplies and Various Items. Had you at 'Lot of Misc.', didn't it? Yeah, me too.


But soft! What stuff from yonder auction breaks? It is the east, and that First Aid Kit is the sun!


Arise, fair First Aid Kit, and kill the envious random-yellow-bin, who is already sick and pale with grief that thou, her erstwhile forgotten kinsman, art more fair than she.
On second thought, I'll keep the yellow bin for hardware.
You can take out Lord Sprinkler Head. I'll take an 'A' in High School English for $300, Alex.
BOOM.

Goodnight sweet prince, and flights of angels sing thee to thy dumpster.
Sorry bro; without a yard, it couldn't have ended well for us.

Anywhooooo.....I acquired an ugly yet functional first aid kit. It looks to be from the early 1990's (hellooooo stripey turquoise images!), is painted metal, came decently stocked, and has room for more stuff.
It has a handle on top and is clearly meant for wall mounting.
I have limited storage space for first aid stuff in my 2nd bathroom, so I figured with a little updating; it could attractively be ready to provide me band-aids come any vengence-related-injuries, and Advil when my head is about to explode and "dammit-I-can't-find-where-I-stashed-that-stupid-bottle" moments happen.

I took said First Aid Kit Box and wiped off a layer of grime. Yum. It had an emergency number taped to the front which was stubbornly holding on for dear life, but a little razor blade action removed what picking at/begging couldn't.

Time for a power tool!

What happens inside my head every time I get to use one.

All the turquoise graphics that were absolutely 'rad' in their time came off quickly with a little low number palm sanding. I wanted to just remove the graphics and leave the white base coat, but got a little overzealous and sanded bare some of the edges. This gave it a nice worn look, so I continued to over-zeal several more places.

Picture taken before the excess of zeal applied.

My bathroom is quirky and the walls are full of pretty random things, so I knew I needed to paint something on the front of the box to help it fit in with the other kids.
Several times I've seen Emily Henderson's use of a large Red Cross flag, and thought this would be an exceedingly appropriate place to use that sort of graphic punch and color scheme.

Style By Emily Henderson
I had some reddish/pinkish/coralish paint lying around that I'd gotten for $0.25 from the 'oops' paint bin at Home Depot, so decided to give it a coat and see how that looked.

Same paint used on the legs of this once-forest-green table.

Measuring very carefully first, of course.


After one coat it was spotty as heck but had potential, so I forged ahead with a glass of wine and gave it a few minutes to dry.
Several coats later, along with some razor blade edge touchups, the cross was finished.

Awesome kitchen lighting, I know

Because the sanded white surface was super porous picked up every spec of grime; the whole thing needed to be sealed. The next day when the cross was good and dry, I grabbed a can of semi-gloss poly-crylic spray from my paint bin and utilized the gloved-hand-on-porch method, with the accuracy and lung-protection properties that have made me famous smarter lazy.
I did 3 coats of the poly-crylic and let it dry outside for several days.

It has great little tab mounting brackets, so I was able to center and hang the thing faster than I can tie my shoes. Which is saying nothing, as I usually get distracted by a cat mid tie.

"Resistance is futile, you will rub my tummy."
-Beans the Snaggletooth

See how the First Aid Kit leans upon the wall. Oh, that I were a fastener upon that wall, so I might touch that First Aid Kit! Ay me!

Weird? Useful? Check and check.

But I can, and I have, and it is working great!


-Lindsay

(yeah, it's been a long month, thanks Shakespeare)

Tuesday, August 13, 2013

Wainscotting Makes Me Feel Fancy

The image in this pin really got my motor going:

pinterest. duh.
And this this one sealed the deal:

A plate shelf on top? SOLD.


I would be wainscotting/board n batten'ing/panelling. Whatever you want to call it.
It had to happen.
My ugly bathroom depended on it.
I had already put in a new floor, so was ready to tackle the walls.

My dad was excited to help me execute the wainscotting/board n batten/panel walls after I'd showed him a million pictures and gushed like a rabid school girl with a Beiber crush. He might have been simply excited for me to shut up. If that was the case: worked like a charm!
He already had a bunch of lumber lying around that we could use. It was new and matching, but thicker than the MDF most tutorials floating around the blogosphere are recommending. This installation had to content with moisture, so it was just as well to go a non-MDF direction. And 'free' always sways my decision to: "ummm.. yeah we're gonna go with that."

I figured out how the spacing of each vertical board would work in the room by guesstimating how much space one hanging towel would take to look nicely framed (ala the top picture), then measured out as many of those panels as would fit on the large wall.  Turns out the answer was 4 panels, so there would be 5 'batten' pieces for the large wall across from the toilet and vanity with about 14.75 inches between each. The other two walls would follow the same batten spacing.
The elements of the wall are as follows:

shelf board needs to straighten up and fly right

The height of the top shelf is just above my shoulder height while wearing heels, so I wont ever smack into it. Cuz I'm a thinker. And a consummate klutz.

Action time:
We cut all the wood Dad had available, ran to Home Depot for a little more, cut that too, and ended up after dark with a big pile in the driveway. All the boards were given a good edge sanding to smooth out any sharp corners and prevent clothing or towel snags.

I do my wooood cutting at night, so I can, so I can.....
watch the sawdust swirl past my eyes

It made me a bit nervous that this mass of wood was going to be put into my smallish bathroom. As it made its way onto the wall though, the pile (& anxiety level) quickly shrunk as the wainscotting began to take shape.

framed out large wall

All of the boards were held up in place first and given several small pilot holes. A big thanks to my Dad and the Bf for holding up the big horizontal header boards as I leveled and drilled! Each corresponding hole in the wall got an anchor, and the holes in the wood got countersinks.
I put up a frame of the header, footer, and outside vertical boards first, then repeated the process with the remaining vertical battens. These got attached to the wall in about a million points so that even with moisture in the picture, they would not warp.
The top moulding was screwed into the header board, and the 3.25" plate shelf (same width as the vertical boards) screwed into the wide supportive surface created by the tops of the moulding and header board.

Wood filler x a $#!+ ton of holes = a crazy long time

As you see above, all those holes got patched with wood filler. Every place where wood met the wall also got wood filler (ex. sides of the battens), as well as every place a piece of wood met another piece of wood (ex. batten to header board).
Sanding all of the wood filler spots, refilling, waiting, and re-sanding was by far the most tedious part of this project and dragged on for about a month because I was not a fan and kept avoiding it.
I learned afterwards that you can do the edges and joins with caulk.... :|
If I ever do wainscotting again: I will definately be doing that to minimize the sanding portion of the project.
Once I put my big girl pants on and finally finished the sanding, it was time to paint. Everything got a coat of white primer, followed by a slightly off-white semi-gloss to match the color of the tiles. This helped to unify the room and avoided making the tiles look dingy.

For the towel hooks: Ikea's BLECKA hooks had the modern look and inexpensive price I was going for. But what a terrible name!! Poor towel hooks, they are going to get a complex.

$5 for 2 - 2.75" hooks
$5 for 4 - 1..5" hooks

I used 4 of the large ones on the long wall for bath towels, 2 of the smaller ones on the toilet/vanity wall for hand towels, and 2 more of the smaller ones on the back of the door to replace the existing rusted hook.

Fancy, fancy!!

This project gave me a huge boost of confidence that I could see something I liked, and translate it to my space in a high quality and inexpensive way.

Price breakdown:
Wood - Free! (probably would have been about $80)
Hooks - $15
Paint - $20
   Hardware - $15  
Total - $50
(if not for Daddy-o's lumber: $130)


-Lindsay

Friday, August 9, 2013

Storage, in a Time of Limited Space (master bathroom edition)

Let me paint you a picture of my 'master' bathroom.

yeah this is a picture, 'painterly' words below

It's on the hall rather than connected to a bedroom, which I consider awesome because:
   1. I live here alone, so theres no need for the additional privacy of an en suite.
   2. In a 1.5 bathroom/2 bedroom unit, the off-the-hallway factor makes it guest/host friendly: cuz I am just fine with people NOT walking through my bedroom to get to the shower when staying over.
   3. For the future: it's very rental friendly. Two housemates would not go for a unit with a single shower that is an en suite. Having it in the hallway gives equal access. While I'm not going to be renting the place out for a couple years, I definitely kept that potential in mind when looking at places, and the hallway bath was one of the reasons that made this particular property stand out from the field. I have a good friend with a 1 bath (en suite) condo who loves to entertain, and it works for her because she is super neat and tidy; but I know my shortcomings, among them that my bedroom is almost never presentable enough to be a public thoroughfare.
So, long story long: I knew what in a bathroom would work for me, and luckily found it.

though it looked like this at first

While I do like my bathroom, it is standard 5'x10', which does the job nicely, but is not what anyone would call spacious. The vanity is small and mainly used for cleaning materials/toilet paper/curling irons/other big stuff. I have lots of soaps n lotions n hair products that needed a home though too. I'm a girl, goes with the territory, right?
I wanted to store all my bottled items within arms reach, in an organized and non-hoarder-ish way. The vanity counter top is small and looks cluttered with more than a few items. There is no room for a storage tower all occupiable floor space already has inhabitants (small grey trash can between tub n toilet, basket with rolled towels between toilet and vanity).

I'm excessively fond of this basket.
$10 at T.J. Maxx

As the saying goes: to the windooooow, to the wall..... or something like that. I have no window in there, so wall it was. I wanted to keep the space as open as possible, so though glass shelves would do nicely. As usual: enter Ikea, with the GRUNDTAL glass shelf.
$20 for 31"

I hung them on the same wall as the vanity, because the toilet sticks out underneath, so I wouldn't be running in to them there. Cuz if they were on the opposite wall, I'd have lost an eye in no time, and 'Pirate' is not a good look.
I really like how the paint color on the wall goes with the color of the glass.


Once the shelves were up, I needed bins of some sort to group small items, because I knew things were never going to be as sparsely populated as the picture above. I cut up an old t-shirt and crocheted it into a little basket with side handles.

lots of items, all in their place

It's adorable and I'm a big fan, but cutting up the t-shirt and crocheting gave me a blister big enough to stop after one basket.
I had 4 small grey felt bins lying around that I'd picked up on clearance from Michaels at some point in the unrememberable past.


I knew all that craft item hording would pay off at some point!! Most small items live in those bins.


Frequently used things live in the corner of the vanity and can be easily moved up to a shelf when people come over.
Face wash, sunscreen, chap stick, etc, live in the crocheted basket.
Jewelry gets deposited at the end of the day in a teacup I made in college and a saucer my mom gave me.
Toothbrush and toothpaste lives in a blown glass cup from an art studio in St.Louis I visited with my grandmother.
I really enjoy to interacting with special things on a daily basis to fulfill a need, rather than say going out and buying a matching bathroom set from Target. Not that I have anything against Target, it's just nice to use meaningful items rather than have them sit in a box or on a dusty shelf.


Ahhhhhh......organization I can keep up with, for $55.


-Lindsay

Thursday, July 18, 2013

A Clean Slate Floor

Those who knows me well know that I unequivocally, absolutely, with few to no exceptions; hate hearts.
Not the ones that pump our blood, I'm quite fond of those. 
The heart shape as an image. Yuck. Not a fan. There was even a christmas gift incident where a matching set of swarovski heart shaped jewelry had to be exchanged. Probably was a bit bratty of me, but the bf could tell upon my unwrapping of them that I was never, never, never going to open that box again. Like, ever.
Moral of the story: me no likey the hearts.
Enter this floor:

oh yeah, there was some wall reconstruction involved too

I did not notice the hearts on the master bathroom floor due to a big fluffy white rug that was down during it's showing, inspection, and final walkthrough. I knew it was pink n white n ugly, but untill daily use: the hearts eluded me. Note to self for future home purchases: look at the freekin bathrooms in tremendous detail and take pictures!

Large scale slate had caught my eye as a replacement possibility. 

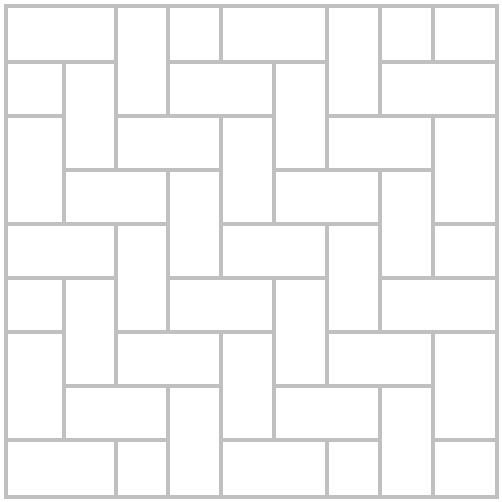
In particular, I liked the use of light grout with a herringbone pattern.

pinterest

Real slate was out of the picture due to price and the fact that large tiles are difficult to lay on an uneven floor like mine. I was not going to rip up all the existing tiles and go down to the concrete subfloor, as I did not want to move the toilet or vanity. I also knew water could permeate through cracks and slab joints in the concrete, and the floor seemed to be watertight as it was. Thus, I figured best to leave it alone and tile overtop. Further down, I'll go over how I prepared the existing floor for the new tile.
But I digress. My main goals with a new floor were: I wanted to keep the materials cost as low as possible, for the installation to be easy enough to do myself, for the result be durable, and of course attractive.
I started seeing information on groutable vinyl based tiles which were thicker and more durable than normal peel-n-stick vinyl.   
They looked fantastic and came in a slate version from Home Depot.


The reviews were overwhelmingly positive and the 'success' pictures looked great

You go Kotzwoods.

I thought I could do the job with one $50 box, but ordered two to make sure I had enough.
The existing floor needed to be flat and smooth. It had both grout lines, tiles with raised heart designs (barf), and ramped up edges where the floor met the wall due to curling laminate beneath the tile. 

I am an artiste.


I started by tackling the ramped up edges with a chisel and a mallet.  Removing the outer row of tiles and the laminate beneath exposed a little of the concrete subfloor, created a trench all the way around the room, but otherwise made the remaining surface flat(er). 
I applied premixed leveling concrete compound with a float to smooth the textured surface. I really wanted everything to stick and make the floor last, so I'd sanded and primed the tiles before the leveling compound went on.

$9 for 1Qt. Not nearly enough. Even for a small space, get the big bucket.

This stuff was great! The first coat filled in the trench and most of the grout lines. A second coat finished off the top of the grout lines and skimmed over the raised texture on the tiles. I scraped and sanded any ridges off the surface and swept, vacuumed, and wiped all dust off the surface in preparation for laying the tile.  

But how should I lay the tile? I knew I liked herringbone, but wanted to test out my options before committing. I tried subway (both long and short ways), and standard grid pattern, but still loved the herringbone. 

you can see the skimmed floors with a filled in trench by the wall
Doing that pattern on a diagonal with the big 12x24 tiles totally overwhelmed the small space. I decided to rotate the pattern 45 degrees and go in right angles to the walls.

comme ca.
or in german: folgendermaßen.
oh you germans.

The tiles are peel and stick, but you can also use mortar to make them bomb proof. Because my subfloor was slightly wavy, I was going to lay these down on top of existing tile, and moisture would be involved; I picked up some pre-mixed mortar to stick those suckers down. 

$22 and way more than I needed.
I put the tiles down in standard tile laying fashion with a trowel, applying mortar, and pressing the tile down onto the mortar. I used spacers to keep everything even. For cutting the tile, I used a utility knife and a dremel. The utility knife probably would have sufficed, but who am I to stand in the way of a power tool's destiny.
I put in all straight-cut pieces first then went back to tackle curved cuts for around the toilet and door jam.


When I proudly sent my mom the above picture with the toilet, she said "congratulations, you are truly a homeowner if a picture of the base of your toilet makes you giddy". She was right, it was terribly exciting.

floor down, waiting for grout
I let the mortar dry for 72 or so hours and proceeded to grout. The grout that was recommended for the vinyl tile is a flexible pre-mix, again from simpleset. I went with the off white 'Alabaster' variety.

$11 at Home Depot. Good amount for the job.

There is a difference in how you put grout on vinyl tiles and regular tiles. For vinyl, keep it as much to only the grout line as possible. I used a float, but if I did it again, would have used an icing bag and a spatula. It was a royal pain to scrub it off the tiles, and I'm sure a good bit of residue did not come completely off by the time I gave up. I'm telling myself lies and saying it looks more 'stone like' this way.


Voila! Beautiful floor and another huge improvement for the room! With a 30 year guarantee to boot.

cost breakdown:

tile (ended up needing only one box) $50
mortar $22
grout $11
leveling compound ~$30
    float $3   
$116


Boom. One of the best bang-for-the-buck projects I've done here.
Everyone who sees them thinks they are real tiles. I however, cant keep my mouth shut and enjoy telling everyone the gloriousness of their vinyl-osity. An agent girlfriend came over and thought it instantly upped the value of the place, and said she would be recommending it to all her clients that needed low-investment floor fixes to get their places sold.

I'm a veritable vinyl flooring PSA.


-Lindsay


Wednesday, July 10, 2013

DIY Tub and Tile Reglazing

As I mentioned briefly in the Rehabbing a Bad Bathroom post; the tub surround in my master bathroom got redone, and there is a slightly bigger hole in the ozone. Both shall be explained here. Warning: this is a wordy post.

The Leadup ~
When I looked at the place, the master bathroom was boring, had an ugly floor, but gave an overall impression of being clean and functional. I even liked the simple white waffle-weave shower curtain.


I don't know why it did not occur to me to pull back that shower curtain and look at what was inside. I'd looked and formed opinions of the showers in every other property I went through. Seems I was blinded by love for the place and forgot all about bathroom due diligence.
Bad move kid.
During the home inspection, the inspector went to have a gander at the shower, but upon pulling back the curtain, we saw no shower stall; only ooold, crusty, sliding glass shower doors. Ok, not a big deal, I could easily rip them out and patch the holes with caulk.
When he opened the door, I was quite displeased to see brownish-green tile on the surround, with patches of white tile around the bottom.
What the what???
The white tile was clearly a replacement of some of the avocado tiles. The inspector didn't see any current issues; so whatever the problem was that necessitated the fix had been solved. Again, not a deal breaker, but the avacadosity was a much bigger issue and I was a bit grumbly at this point for the suprise, and that I hadn't seen it sooner.

A shot after the doors were removed.
Oh honey.....what did they do to you??

After removing the doors, there was adhesive left behind from the bottom track. It was applied in such a way that it had not sealed the connection between the track and the tub, so water leaking in over time had created mold, which in turn had eaten into the porcelain. Removing the mold and the adhesive left a very pitted strip all the way across the top of the tub wall. It is the grey line in the picture above.
The tiles were so ugly, I'd known that I wanted to reglaze them. With the exposed iron on the tub, I would need to reglaze the whole of that as well, since patching looks cruddy and is not durable.


Reglazing~

I had seen all sorts of information about getting a professional company to come and reglaze tile, but surprisingly found no home-blogger tutorials or walk throughs about doing it yourself with a kit.
While professional reglazing seemed to produce amazing results and garner tons of rave reviews, there was an equal amount of doom and gloom statements about how the diy kits are horrible to use, have immediately bad results, and fail quickly. I did not want to waste time or money on the kits only to run into trouble later, but neither was I going to be paying someone hundreds of dollars to do it, nor replacing the tub and tile.


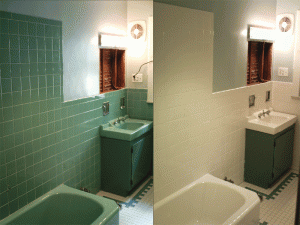
An example of professionally reglazed tub and tile.
The floor seems to have eluded capture.

So, I ended up doing a lot of research into why the professional method was so great, and why the diy method seemed to not work. The diy method seems to have the following critical failings:
1. Does not use etching chemicals, leading to bad glaze adhesion.
2. Hard to apply evenly, so produces a lumpy, uneven, dull, and unattractive surface.
3. Takes a long time to dry.
4. Harsh chemical smell.
5. Immediate or soon after scratching, chipping, or bubbling.

It seems that the lack of a porous surface for the diy kit's epoxy to mechanically bond with was the root of all evil.
I thought that I could overcome that big adhesion issue, work with the material's application limitations, minimize my contact with the fumes, and give it plenty of time to dry as I hadn't moved in yet. I bought 2 kits and dove in.

$37 at Home Depot

I read the instructions, and it seemed that the process was indeed insufficient to create a good surface for adhesion. It told users to prep the surface simply by using the provided degreasing wash and scrubbing with steel wool.
As with some other people who seemed to get good results (per the product reviews), I deviated from the directions for both surface prep and glazing.

I'll spoil the secret now: I got FANTASTIC results that have lasted for 8 months so far and show no signs of potential spontaneous failure. Listed below are the steps to get there.

Surface prep steps:
1. Scrub the heck out of the tub and tile with heavy duty household cleaner.
2. Remove all caulk. 
3. SAND the tub and tile with a mid level grit sandpaper. 
I used an orbital sander and 120 grit paper. You don't want to gouge the tile, just remove the shiny top glaze.
Use a particulate filtering mask, same as with any sanding project, to avoid inhaling the powdered glass.
4. Use the steel wool to scrub the surface with the provided cleaner product. 
I doubt this made much of a difference, but I did so for good measure anyway.
Be careful here, the caulk is gone so try and minimize the amount of wash seeping into any cracks.
5. Repeat steps 3 and 4, two times through. 
This wash n abrade cycle is actually on the instruction sheet. With sanding, this lets you gradually and evenly remove the shine from the tiles.
6. Wipe dry and let air out for a day or two. 
This lets any moisture that has gotten through caulkless seams dry out so you don't create a mold vault.
7. Tape edges and hardware.

Glaze prep steps:
1. Set the temperature to above 70.
This will help the glaze cure strong and be shiny.
2. Turn on the fan in the bathroom.
3. Put on some teeny and/or lightweight clothing.
Even with the fan on, it's gonna get hot in there with the door closed.
4. Mask up.
Get a mask that protects you from vapors/fumes. This will generally be a N95 or R95 rated mask. The epoxy is seriously not good for your lungs, and though masks are not the most stylish or comfortable things to wear: cancer is clearly less fun. Suck it up, it wont cost you much and you'll probably wear it again for another project. Or be someone from The Hot Zone for halloween. Or both. 
5. Put on a pair of goggles. 
Again, this is a big boy epoxy and your eyes will not like it. Grab a pair from your swimming stuff. 
6. Take a picture of yourself. You are aquaman. Nice short shorts. 

Tile Glazing steps:
Note: For changing the color of tile, it is recommended you use the brush on type rather than the spray. You are not going to be able to fight the fact that you can't get a perfectly smooth finish without spraying. Work with the nature of the material, and your inevitably imperfect diy technique, to come up with an attractive result rather than trying to fight it.

1. Use a BRUSH to apply an initial THIN layer of glaze to the tiles.
Ignore the instructions that say roller for this part.
2. Start in a top corner of the tile surround and brush in the same diagonal direction for all strokes.
This is part of the working with the material ramble above. Rollers are for flat and even results, which just aint gonna happen, so why set up the project for failure? Textured tiles exist in the world, so it was not a stretch to make these patterned, thereby also giving myself a lot of wiggle room for lumps and mistakes.

Here you can see the brushing texture and level of coverage on the first coat.

3. Go horizontally across each section then top to bottom.
This worked well for me and helped me keep a consistent and blended brush stroke.


Wrapping up the 1st layer.

After you have finished the surround, move onto the tub.

Tub Glazing steps:
1. Use a roller to apply an initial REALLY THIN layer of glaze.
While there is such a thing as textured tile, there are no textured tubs. Also, the tile is at eye level whereas the tub is at your feet. Any imperfections here due to the roller will be less noticeable.
The glaze seems to work and dry better on vertical surfaces than horizontal. When horizontal layers are applied too thick, it does not dry well. I know this because I did have issues in some spots where I'd caked it on and had to fix later. Not a problem with the product, just my application.
2. Start at a back corner and slowly work your roller back and forth longways in sections around the tub.
Do whole sections at once to minimize ridges: all of the wall-adjoining rim, all of the far side wall, front wall, back wall, etc.
3. Roll longways across all tub surfaces to tie in sections.
Work quick, this can't be done if it has already gotten tacky.
4. Don't forget the front of the tub.

Drying:
1. Give it 3 days to dry.
The directions tell you to redo it in a couple hours, or a couple days. This stuff is notoriously slow to dry, which happens when multiple layers are applied too soon, and it becomes a molten wrinkly nightmare. Have patience and give each layer a good long time to dry before slopping on the next one.
2. Leave temperature set, bathroom fan on, and door closed. Turn on the house fan.
If it's possible, stay out of the house for those three days, as the smell will waft even with the door closed. If this isn't an option, make sure to keep some windows open and the house fan on.

After 1 layer.
Already a huge difference!

After the first layer, you will see the spots of the old tile color showing through, grout lines that need more glaze, etc. Thats fine, leave it be. Once it's dry, you've got two more layers to go which will even everything out.
The picture above does not show the imperfections well, but you can see them in the close-up shots.

An additional two layers resulted in this:

oooooh...aaaahhhh

The directions will tell you to give the last layer extra time to dry. Do it. Double it. Triple it. Then add a couple extra days. You don't have to have the fans on, the heat cranked, or the door closed, but do not use the shower. This looong final drying time is another key step in making sure it is durable.

When I finished, the ugly paint on the wall was looking uglier compared to the shiny new white tiles, so I primed and painted a quick coat of tiffany blue on it. The wall color was later tweaked and more green added, but I digress.
The effect that the glazing had on the room, helped by updated paint, was tremendous.

Before & After

As I mentioned above: the results were great. I have not had any bubbling, cracking, or peeling. I did have some molten wrinkly issues on several horizontal spots in the tub where I'd put on layers too thick. That took several months to dry completely, at which time I sanded the wrinkles away and applied a thin layer to just those problem areas. That was my bad, not the kit, so overall I'd say from what I've seen so far, using the at home kit is a good money saving bet if you go above and beyond the directions a little bit.


-Lindsay